Tuesday 18 February 2014

Porthello Legends - Android Reversi Port

I wrote a clone of the game Reversi/Othello for Android three years ago and it actually made some progress on Google Play (Market as it was called then). It was downloaded nearly 1000 times and a lot of players seems to have enjoyed it because I could see in the highscore lists and the Analytics statistics that they spent quite some time on trying to beat the AI to gain access to even harder levels.

Unfortunately, the name Othello Legends was a bad choice since it was trademarked. That meant that after 6 months the game was suspended from Google Play. Since I put quite a lot of effort into the game it is a shame that it disappeared and I have now done a refactoring to the new name Porthello Legends :-).


My Android tablet died last summer and all I got to test with is an pretty old HTC Desire which the game seems to work fine on. It would be interesting to get feedback on how the game performs on newer phones/tablets as well.

Check out the game at Google Play, search for "Porthello Legends" or go to https://play.google.com/store/apps/details?id=se.noren.android.porthello&hl=en.


The old blogpost on the inital release can be found here http://macgyverdev.blogspot.se/2011/12/othello-legends-10-in-android-market.html.

Tuesday 11 February 2014

Apache web server as reverse proxy and virtual host for Tomcat 7

I'm running a couple of sites on a Linux server on my local network. I only have one public ip address but I want to be able to host multiple sites on my servers. So this can be done by using a reverse proxy in front of the application servers which delegates traffic depending on which host name the end user was trying to request.

I've implemented this by using the reverse proxy feature with virtual hosts in the Apache HTTP web server.
The result this exercise is trying to achieve is that external traffic from internet requesting pages from the site www.all-about-units.com which is DNS mapped to my public ip address will be routed to the Apache web server on the local network via a port forwarding rule in the router on the local network. The Apache web server will look into its rules for virtual hosts and see that the user requested the domain www.all-about-units.com and therefore delegate the traffic to a separate Apache Tomcat 7 servlet container running on the local network to serve the request. The traffic is then forwarded back through the web server to the end user.

Setup Apache HTTP server as reverse proxy

First of all the Apache HTTP web server must be installed. I had mine installed since long ago but if I remember correctly there's not much than doing this is you have a Debian/Ubuntu/Mint like Linux server

sudo apt-get install apache2

Now, to enable the reverse proxy feature of the Apache server

/ $ sudo a2enmod proxy_http

Next, we must create a configuration for our new site as a virtual host. Go to the directory of available sites

/etc/apache2/conf.d $ cd /etc/apache2/sites-available/

Copy the default configuration to a setup for your site

/etc/apache2/sites-available $ sudo cp default all-about-units

Lets edit the configuration file. The first line tells the Apache server to listen on port 80, the standard HTTP port. Next the names of the virtual host are given. So traffic requesting another domain name or the ip address directly will not be handled by this virtual host configuration.

Next look att the ProxyPass and ProxyPassReverse, these tell Apache where to forward the request that has matched this virtual host rule. In this case to the Tomcat server on the same machine (127.0.0.1 is the loopback address of localhost) but on port 8080. The slash before the address means that all requests should be forwarded to the  Tomcat server. If for example you had ProxyPass /foo/bar/ http://127.0.0.1:8080/ then the request www.all-about-units.com/foo/bar/page.html would be redirected to 127.0.0.1:8080/page.html

/etc/apache2/sites-available $ sudo vim all-about-units
<VirtualHost *:80>
  ServerName all-about-units.com
  ServerAlias www.all-about-units.com
  ProxyRequests Off
  ProxyPreserveHost On
  <Proxy *>
    Order deny,allow
    Allow from all
  </Proxy>
  ProxyPass / http://127.0.0.1:8080/
  ProxyPassReverse / http://127.0.0.1:8080/
</VirtualHost>

Enable and disable the site

To tell the Apache HTTP web server to enable this configuration, run the a2ensite command on the name of the new configuration

/etc/apache2/sites-available $ sudo a2ensite all-about-units
Enabling site all-about-units.
To activate the new configuration, you need to run:
  service apache2 reload

Reload Apache

/etc/apache2/sites-available $ sudo service apache2 reload
 * Reloading web server config      

I had some issues so I restarted Apache the hard way also and then it works.

/etc/apache2/sites-available $  sudo /etc/init.d/apache2 restart
 * Restarting web server apache2                                                          apache2: Could not reliably determine the server's fully qualified domain name, using 127.0.1.1 for ServerName
 ... waiting apache2: Could not reliably determine the server's fully qualified domain name, using 127.0.1.1 for ServerName

That's it!

Verify in the logs of the application server that the request are directed correct and your home.
Next step might be to enable the mod cache feature of Apache to let the web server handle caching of all static material served by the application server like css, images and javascript. More on that in another post.

If you for some reason want to take the site of the web for some time you can instead of stopping the application server disable the site in the web server virtual host forwarding by using the command

sudo a2dissite all-about-units

Tuesday 4 February 2014

How to make Jenkins install the packaged war in a Tomcat 7

This is a sequel to http://macgyverdev.blogspot.se/2014/01/setup-jenkins-project-from-git.html where I set up Jenkins to build my latest project. The next step is to install the war-file built by Jenkins on my Tomcat 7 server.

First of all we must make sure Tomcat accepts installations by scripting instead of the human html GUI version. In the tomcat-users.xml file, located in something similar to this:

/var/lib/tomcat7/conf/tomcat-users.xml

Make sure that the admin user, whatever his name is, has the role manager-script. Here's the important part of my file:

<tomcat-users>

<role rolename="manager-gui"/>
<role rolename="manager-script"/>
<role rolename="manager"/>
<role rolename="admin-gui"/>
<role rolename="admin-script"/>
<role rolename="admin"/>

<user username="admin" password="somethignsecret" roles="manager-gui,admin-gui,manager,admin,manager-script,admin-script"/>

</tomcat-users>

Now, in Jenkins you must install the Deploy Plugin. You find it in the plugins section.


Your Jenkins job is here assumed to be configured to package a war file. You can verify this by inspecting that a build generates a war file like this:

~/.jenkins/jobs/UnitConversion/workspace/target/Unitconversion.war

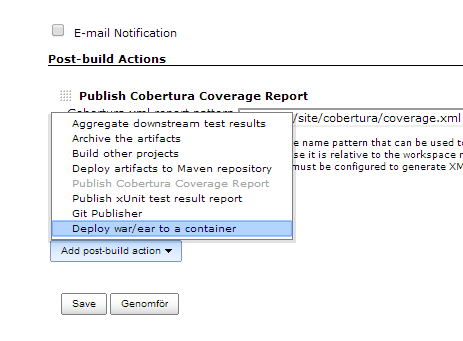
For this Jenkins job, go to the settings page and add a new post-build action. Choose the "Deploy war/ear to a container".

In this view make sure the path to the packaged war is relative to the workspace area of the job. Most probably it will be "target/yourapp.war".


Now, rebuild your job and when inspecting the console logs you should see that the war/ear is installed!

Deploying /home/johan/.jenkins/jobs/UnitConversion/workspace/target/Unitconversion.war to container Tomcat 7.x Remote
  Redeploying [/home/johan/.jenkins/jobs/UnitConversion/workspace/target/Unitconversion.war]
  Undeploying [/home/johan/.jenkins/jobs/UnitConversion/workspace/target/Unitconversion.war]
  Deploying [/home/johan/.jenkins/jobs/UnitConversion/workspace/target/Unitconversion.war]
Finished: SUCCESS

This way it takes two clicks from editing the code in Eclipse to update the site All About Units in production, first commit and push to Git, second start the Jenkins job.

One note, if you have deployed your application with context root "/" in Tomcat as I have done, see http://macgyverdev.blogspot.se/2014/02/how-to-change-context-root-to-in-tomcat.html, you can not have Context path = "/" in the configuration above. Instead, keep multiple context roots in Tomcat, and as in my example add the context root with a longer name, otherwise the deploy plugin cannot undeploy the ROOT web application. If you according to my blog post on it has manipulated the server.xml a reinstallation of "/webappname" will also reinstall the ROOT application since they point to the same directory on disk.

How to change context root to / in Tomcat 7

Here's my problem, I have a new project going which will be deployed as http://www.all-about-units.com/en. It's a site for general facts and info about units. It's a Java web application running on a Tomcat 7 servlet container. It is automatically deployed to the context root "Unitconversion" since that is the name of the WAR-file when it is uploaded via the admin ui.
That means I will access it as

http://myserver:port/Unitconversion

I want it to be deployed as context root "/" so that the URL becomes this in production

http://myserver:port/

My Tomcat 7 is running on a Linux Mint server but I guess these instructions are the same regardless of operating system. Here's how I managed to get it working.

First I uploaded my new web application in the Tomcat manager admin GUI. We got something like this now.


Now, if you inspect the file system you should have your app deployed at  /var/lib/tomcat7/webapps.

johan@johanhtpc /var/lib/tomcat7/webapps $ ll
total 31040
drwxrwxr-x  5 tomcat7 tomcat7     4096 feb  4 20:22 .
drwxr-xr-x  6 root    root        4096 dec 18 19:25 ..
drwxr-xr-x  3 root    root        4096 dec 18 19:25 ROOT
drwxr-xr-x 10 tomcat7 tomcat7     4096 feb  4 20:22 Unitconversion
-rw-r--r--  1 tomcat7 tomcat7 23617897 feb  4 20:22 Unitconversion.war
drwxr-xr-x  8 tomcat7 tomcat7     4096 dec 28 12:44 WeatherStationServer
-rw-r--r--  1 tomcat7 tomcat7  8140647 dec 28 12:44 WeatherStationServer.war

The hacky way now would be to change the ROOT application with my new code, a simple overwrite with my web app. But that doesn't smell so good...

So what you do is that you edit

/var/lib/tomcat7/conf/server.xml

and add these lines inside the <Host> element. Change "Unitconversion" to your application name.

<Context path="" docBase="Unitconversion">
   <!-- Default set of monitored resources -->
   <WatchedResource>WEB-INF/web.xml</WatchedResource>
</Context>
<Context path="ROOT" docBase="ROOT">
   <!-- Default set of monitored resources -->
   <WatchedResource>WEB-INF/web.xml</WatchedResource>
</Context>

This will make the default root application appear under context root "/ROOT".
Restart Tomcat to make changes take place.

sudo /etc/init.d/tomcat7 restart

And now the app is accessible at "/" and at the old context root "Unitconversion" as well. This is also seen in the GUI if you refresh the manager.